canvas--使用样式和颜色

如何在绘图中添加不同的颜色、线条样式、渐变、图案、阴影

1.色彩 Colors

1.1设置图形填充颜色 fillStyle = color

1.2设置图形轮廓颜色 strokeStyle = color

color可以是表示 CSS 颜色值的字符串,渐变对象或者图案对象。

fillStyle

1
2
3
4
5
6
7
8
9
10
11
12
function draw() {
var canvas = document.getElementById('tutorial');
if (canvas.getContext) {
var ctx = canvas.getContext('2d');
for (var i = 0; i < 6; i++) {
for (var j = 0; j < 6; j++) {
ctx.fillStyle = "rgb(" + Math.floor(255 - 42.5 * i) + "," + Math.floor(255 - 42.5 * j) + ",0)";
ctx.fillRect(j * 25, i * 25, 25, 25);
}
}
}
}

效果如下:

strokeStyle

1
2
3
4
5
6
7
8
9
10
11
12
13
14
15
function draw() {
var canvas = document.getElementById('tutorial');
if (canvas.getContext) {
var ctx = canvas.getContext('2d');
for (var i = 0; i < 6; i++) {
for (var j = 0; j < 6; j++) {
ctx.strokeStyle = "rgb(" + Math.floor(255 - 42.5 * i) + "," + Math.floor(255 - 42.5 * j) +
",0)";
ctx.beginPath();
ctx.arc(12.5 + j * 25, 12.5 + i * 25, 10, 0, Math.PI * 2, false);
ctx.stroke();
}
}
}
}

效果如下:

2.透明度 Transparency

除了可以绘制实色图形,我们还可以用 canvas 来绘制半透明的图形。通过设置 globalAlpha 属性或者使用一个半透明颜色作为轮廓或填充的样式。

2.1 通过globalAlpha设置全局透明度 globalAlpha = transparencyValue

globalAlpha属性影响到 canvas 里所有图形的透明度,有效的值范围是 0.0 (完全透明)到 1.0(完全不透明),默认是 1.0。

2.2 通过CSS3颜色值设置透明度

1
2
3
//  指定透明颜色,用于描边和填充样式
ctx.strokeStyle = "rgba(255,0,0,0.5)";
ctx.fillStyle = "rgba(255,0,0,0.5)";

globalAlpha

1
2
3
4
5
6
7
8
9
10
11
12
13
14
15
16
17
18
19
20
21
22
23
24
function draw() {
var canvas = document.getElementById('tutorial');
if (canvas.getContext) {
var ctx = canvas.getContext('2d');
// 画背景
ctx.fillStyle = "#F00";
ctx.fillRect(0, 0, 75, 75);
ctx.fillStyle = "#FF0";
ctx.fillRect(75, 0, 75, 75);
ctx.fillStyle = "#F0F";
ctx.fillRect(0, 75, 75, 75);
ctx.fillStyle = "#0FF";
ctx.fillRect(75, 75, 75, 75);
ctx.fillStyle = "#FFF";
// 设置透明度值
ctx.globalAlpha = 0.2;
// 画半透明圆
for (var i = 0; i < 7; i++) {
ctx.beginPath();
ctx.arc(75, 75, 10 + 10 * i, 0, Math.PI * 2, true);
ctx.fill();
}
}
}

效果如下:

注意:先画图,还是先设置透明度ctx.globalAlpha = 0.2,所得的图形透明度有差异

1
2
3
4
5
6
7
8
9
10
11
12
13
14
15
16
17
18
19
function draw() {
var canvas = document.getElementById('tutorial');
if (canvas.getContext) {
var ctx = canvas.getContext('2d');
// 设置全局透明度
ctx.globalAlpha = 0.2;
// 画背景
ctx.fillStyle = "#F00";
ctx.fillRect(0, 0, 75, 75);
ctx.fillStyle = "#FF0";
ctx.fillRect(75, 0, 75, 75);
ctx.fillStyle = "#F0F";
ctx.fillRect(0, 75, 75, 75);
ctx.fillStyle = "#0FF";
ctx.fillRect(75, 75, 75, 75);
ctx.fillStyle = "#FFF";
// 画的矩形均为半透明
}
}

效果如下:

CSS3颜色值

1
2
3
4
5
6
7
8
9
10
11
12
13
14
15
16
17
18
19
20
21
22
function draw() {
var canvas = document.getElementById('tutorial');
if (canvas.getContext) {
var ctx = canvas.getContext('2d');
// 画背景
ctx.fillStyle = 'rgb(255,221,0)';
ctx.fillRect(0, 0, 150, 37.5);
ctx.fillStyle = 'rgb(102,204,0)';
ctx.fillRect(0, 37.5, 150, 37.5);
ctx.fillStyle = 'rgb(0,153,255)';
ctx.fillRect(0, 75, 150, 37.5);
ctx.fillStyle = 'rgb(255,51,0)';
ctx.fillRect(0, 112.5, 150, 37.5);
// 画半透明矩形
for (var i = 0; i < 10; i++) {
ctx.fillStyle = 'rgba(255,255,255,' + (i + 1) / 10 + ')'
for (var j = 0; j < 4; j++) {
ctx.fillRect(5 + i * 14, 5 + j * 37.5, 14, 27.5)
}
}
}
}

效果如下:

3.线型 Line styles

3.1设置线条宽度 lineWidth = value

线宽是指给定路径的中心到两边的粗细。换句话说就是在路径的两边各绘制线宽的一半.
所有宽度为奇数的线并不能精确呈现,这就是因为路径的定位问题。

1
2
3
4
5
6
7
8
9
10
11
12
13
14
function draw() {
var canvas = document.getElementById('tutorial');
if (canvas.getContext) {
var ctx = canvas.getContext('2d');
for (var i = 0; i < 10; i++) {
ctx.lineWidth = 1 + i;
ctx.beginPath();
ctx.moveTo(10 + 14 * i, 10);
ctx.lineTo(10 + 14 * i, 140);
ctx.stroke();
}

}
}

3.2设置线条末端样式 lineCap = value

3.3设置线条与线条结合处样式 lineJoin = value

3.4限制当两条线相交时交接处最大长度 miterLimit = value

所谓交接处长度(斜接长度)是指线条交接处内角顶点到外角顶点的长度。

3.5返回当前虚线样式 getLineDash()

3.6设置虚线样式的起始偏移量 lineDashOffset = value

4.渐变 Gradients

用createLinearGradient、createRadialGradient新建一个 canvasGradient 对象

4.1 createLinearGradient(x1,y1,x2,y2)

createLinearGradient 方法接受 4 个参数,表示渐变的起点 (x1,y1) 与终点 (x2,y2)。

1
var lineargradient = ctx.createLinearGradient(0,0,50,50)

4.2 createRadialGradient(x1,y1,r1,x2,y2,r2)

createRadialGradient 方法接受 6 个参数,前三个定义一个以 (x1,y1) 为原点,半径为 r1 的圆,后三个参数则定义另一个以 (x2,y2) 为原点,半径为 r2 的圆。

1
var radialgradient = ctx.createRadialGradient(50,50,0,50,50,100)

4.3 addColorStop(position,color)

创建出 canvasGradient 对象后,我们就可以用 addColorStop 方法给它上色了。

  • position 参数必须是一个 0.0 与 1.0 之间的数值,表示渐变中颜色所在的相对位置。0.5 表示颜色会出现在正中间
  • color 参数必须是一个有效的 CSS 颜色值
    1
    2
    3
    var lineargradient = ctx.createLinearGradient(0,0,150,150)
    lineargradient.addColorStop(0,'#fff');
    lineargradient.addColorStop(1,'#000');

createLinearGradient例子

1
2
3
4
5
6
7
8
9
10
11
12
13
14
15
16
17
18
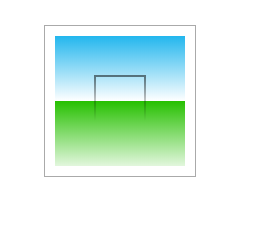
function draw() {
var canvas = document.getElementById('tutorial');
if (canvas.getContext) {
var ctx = canvas.getContext('2d');
var lingrad = ctx.createLinearGradient(0, 0, 0, 150);
lingrad.addColorStop(0,"#00abeb");
lingrad.addColorStop(0.5,"#fff");
lingrad.addColorStop(0.5,"#26c000");
lingrad.addColorStop(1,"#fff");
var lingrad2 = ctx.createLinearGradient(0,50,0,95);
lingrad2.addColorStop(0,'#000');
lingrad2.addColorStop(1,'rgba(0,0,0,0)')
ctx.fillStyle = lingrad;
ctx.strokeStyle = lingrad2;
ctx.fillRect(10,10,130,130);
ctx.strokeRect(50,50,50,50);
}
}

效果如下:

createRadialGradient例子

1
2
3
4
5
6
7
8
9
10
11
12
13
14
15
16
17
18
19
20
21
22
23
24
25
26
27
28
29
30
31
32
33
34
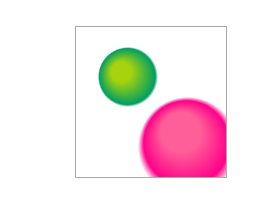
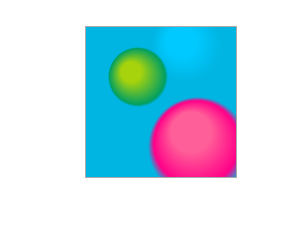
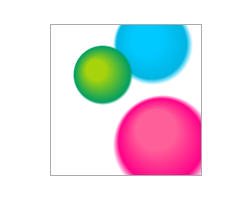
function draw() {
var canvas = document.getElementById('tutorial');
if (canvas.getContext) {
var ctx = canvas.getContext('2d');
var radgrad = ctx.createRadialGradient(45, 45, 10, 52, 50, 30)
radgrad.addColorStop(0, '#a7d30c');
radgrad.addColorStop(0.9, '#019f62');
radgrad.addColorStop(1, 'rgba(1,159,98,0');

var radgrad2 = ctx.createRadialGradient(105, 105, 20, 112, 120, 50);
radgrad2.addColorStop(0, '#FF5F98');
radgrad2.addColorStop(0.75, '#FF0188');
radgrad2.addColorStop(1, 'rgba(255,1,136,0)');

var radgrad3 = ctx.createRadialGradient(95, 15, 15, 102, 20, 40);
radgrad3.addColorStop(0, '#00C9FF');
radgrad3.addColorStop(0.8, '#00B5E2');
radgrad3.addColorStop(1, 'rgba(0,201,255,0)');

var radgrad4 = ctx.createRadialGradient(0, 150, 50, 0, 140, 90);
radgrad4.addColorStop(0, '#F4F201');
radgrad4.addColorStop(0.8, '#E4C700');
radgrad4.addColorStop(1, 'rgba(228,199,0,0)');
// 画图形
ctx.fillStyle = radgrad4;
ctx.fillRect(0, 0, 150, 150);
ctx.fillStyle = radgrad3;
ctx.fillRect(0, 0, 150, 150);
ctx.fillStyle = radgrad2;
ctx.fillRect(0, 0, 150, 150);
ctx.fillStyle = radgrad;
ctx.fillRect(0, 0, 150, 150);
}
}

效果如下:

5.图案样式 Patterns

5.1 createPattern(image,type)

  • Image 可以是一个 Image 对象的引用,或者另一个 canvas 对象。
  • Type 必须是下面的字符串值之一:repeat,repeat-x,repeat-y 和 no-repeat。
1
2
3
4
5
6
7
8
9
10
11
12
13
14
15
16
function draw() {
var canvas = document.getElementById('tutorial');
if (canvas.getContext) {
var ctx = canvas.getContext('2d');
var img = new Image();
img.src = 'https://mdn.mozillademos.org/files/222/Canvas_createpattern.png';
img.onload = function () {
var ptrn = ctx.createPattern(img, 'repeat');
// var ptrn = ctx.createPattern(img, 'repeat-x');
// var ptrn = ctx.createPattern(img, 'repeat-y');
// var ptrn = ctx.createPattern(img, 'no-repeat');
ctx.fillStyle = ptrn;
ctx.fillRect(0, 0, 150, 150);
}
}
}

效果如下:
repeat

repeat-x

repeat-y

no-repeat

6.阴影 Shadows

6.1 设定阴影在x轴的延伸距离 shadowOffsetX = float

负值表示阴影会往上或左延伸,正值则表示会往下或右延伸,它们默认都为 0。

6.1 设定阴影在y轴的延伸距离 shadowOffsetY = float

负值表示阴影会往上或左延伸,正值则表示会往下或右延伸,它们默认都为 0。

6.1 设定阴影的模糊程度 shadowBlur = float

其数值并不跟像素数量挂钩

6.1 设定阴影的颜色效果 shadowColor = color

标准的 CSS 颜色值,用于设定阴影颜色效果,默认是全透明的黑色。

1
2
3
4
5
6
7
8
9
10
11
12
13
14
15
16
function draw() {
var canvas = document.getElementById('tutorial');
if (canvas.getContext) {
var ctx = canvas.getContext('2d');
ctx.shadowOffsetX = 2;
ctx.shadowOffsetY = 2;
// ctx.shadowOffsetX = 2;
// ctx.shadowOffsetY = 20;
ctx.shadowBlur = 2;
ctx.shadowColor = 'rgba(255,0,0,0.5)';

ctx.font = "20px Times New Roman";
ctx.fillStyle = "#000";
ctx.fillText("Shengnan Zheng", 5, 30)
}
}

效果如下:

7.Canvas填充规则 Canvas fill rules

当我们用到 fill(或者 clip和isPointinPath )你可以选择一个填充规则
“nonzero”: 非零缠绕规则, 默认值.
“evenodd”: 奇偶缠绕规则。

1
2
3
4
5
6
7
8
9
10
11
function draw() {
var canvas = document.getElementById('tutorial');
if (canvas.getContext) {
var ctx = canvas.getContext('2d');
ctx.beginPath();
ctx.arc(50,50,30,0,Math.PI*2,true);
ctx.arc(50,50,15,0,Math.PI*2,true);
// ctx.fill("nonzero");
ctx.fill("evenodd");
}
}

效果如下: